Windows Virtual Desktop review

Cloud - A review of Windows Virtual Desktop for business

Our Client Infrastructure Manager and Azure specialist reviews Microsoft’s Windows Virtual Desktop.

Windows Virtual Desktop (WVD) is Microsoft’s newest Platform as a Service offering. It supports multi-session Windows 10 virtual machines and boasts significant improvements to the user experience and capabilities of certain Office 365 apps in a virtual desktop environment.

WVD became globally available as of September 30th, 2019 and is exclusively delivered on Azure. There’s a lot of good press around WVD, but it’s questionable how much of that is just buzz and how much is solid analysis. This article provides a more nuanced breakdown of how applicable WVD is in a business IT environment, what benefits it brings over other virtual desktop solutions, and whether Azure exclusivity is an issue?

How does Windows Virtual Desktop meet key business requirements?

Cost per user

Unlike VMWare and Citrix virtual desktop solutions, WVD does not require additional per-user licensing (such as RDS CALS or Windows Server) to run, making it very appealing to the price-conscious. This is also particularly beneficial for very large organisations as it limits ballooning costs for big user-bases.

WVD is not completely free though. Each user requires a Microsoft 365 or Windows 10 E3 license and you need to pay for the compute to run the virtual machines within Azure, but’s that’s to be expected.

What is the cost of Windows Virtual Desktop?

The precise cost will vary based on your number of users, the quality of the virtual machines and whether you’re using multi or single sessions, but you’ll be looking at around £8.25 per user per month in compute costs in an optimised environment.

Latency

WVD being restricted to Azure makes latency a hot issue since hosting the virtual machines on in-house infrastructure simply isn’t an option.

The (un)fortunate truth here though is that any latency problems are likely to come from your end, rather than from Microsoft’s. Azure is a global platform and Microsoft has enough money to pour into infrastructure that any latency issues are likely to come from your end rather than theirs.

Whilst this doesn’t solve the problem of latency, it does mean that if you already have the Internet connectivity to support cloud-based virtual desktops on a public cloud platform, Azure will not be a bottleneck.

What will my latency be with Windows Virtual Desktop?

There are a few tools to estimate your latency with Azure. This tool calculates the round-trip time with all eligible WVD regions and this tool lets you compare regions more easily.

In WVD’s documentation, Microsoft recommends a latency of below 150ms for a smooth experience, but VMWare documentation suggests below 250ms is still acceptable for running virtual desktops. Depending on your users and the work being done, you’ll likely have an acceptable experience if you can hit below either of those values.

Scalability

Since WVD runs on Azure, scalability is almost limitless – regardless of the size of the business. The only restriction you may face is how much compute you can afford.

However, since a per-user license isn’t required, the price curve of WVD is much shallower compared to Citrix or VMWare. This frees up budget which can then be funnelled into even more Azure capacity or used to create value elsewhere in your business. So, chances are, WVD will meet your scalability requirements easily.

Interoperability

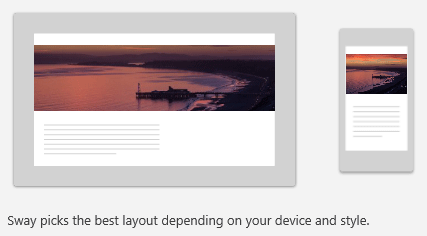
WVD holds native support for Windows, MacOS, iOS, Android and HTML5 environments – the latter allowing for access through a browser window. This lets a WVD virtual machine run on any mainstream device and opens a host of remote working opportunities.

Being a Microsoft product, WVD also integrates tightly with the other Microsoft products which make up the backbone of your operations such as Office 365, Outlook or Windows Server. This shouldn’t come as a surprise, but the tidiness gives WVD a notable sense of refinement compared to the layers of integration and configuration needed for VMWare or Citrix.

A final point regarding application performance and interoperability is that Microsoft acquired FSLogix during WVD’s development which enables seamless use of stateful applications such as Outlook, Teams and OneNote in a virtual environment.

A practical example of this new functionality is that it now only takes a second or two for a user’s Outlook inbox to populate instead of the minute it would usually take on a virtualised system.

This is achieved by containerising users’ profile data (e.g. emails, notebooks or chat messages) into a separate virtual disk which attaches to the session when needed. When you consider the number of times employees check their emails, this already presents considerable time savings.

Benefits of Windows Virtual Desktop

Free extended security updates for Windows 7 virtual environments

In a move that recognises some companies need to stick with Windows 7 to support specialist software (and perhaps as an enticement to coax Windows 7 users to Windows 10 in the long run), Microsoft will provide free extended security updates through to January 2023 if those Windows 7 desktops are virtualised in WVD.

For companies who haven’t yet migrated from Windows 7, or can’t, this is a lucrative offer since it eliminates the costly security updates (£25 per machine in the first year, £50 per machine in the second and £100 per machine in the third) whilst offering a potentially improved desktop environment with the same updates for free.

Offered as a fully managed Azure service

Managing a virtualised environment has traditionally been an enormous headache for IT teams. Not to mention the upfront slog there is to even get the environment set up correctly in the first place. Microsoft has eliminated much of this pain in WVD by making it a fully managed Azure service.

This takes all the infrastructure management, optimisation and fine-tuning off your plate and tasks like load balancing, diagnostics, gateways and connection brokering are fully managed whilst still being configurable to your requirements.

Configurability also extends to other areas of the virtual environment such as the size of the virtual machines, specific resource allocation to specific user groups, whether users are assigned using a breadth or depth technique and more. These options are managed through the Azure interface rather than requiring configuration on the back-end which keeps things simple for you as well.

In-built security and compliance

Whilst users may think access to files from anywhere on any device is a flexible working dream, for IT teams it sounds a lot more like a security nightmare. Fortunately, Microsoft has provided several security options which can let you sleep easier at night.

Probably the biggest security concern is that data stored on too many devices means an instant GDPR breach if any of those devices are lost or compromised. To alleviate this concern, configurable information protection controls are easily accessible and allow IT Managers to ensure data stays on the virtual machine and never resides on the connecting device.

WVD running on Azure also means you get to have your data and systems hosted in some of the most secure data centres in the world. Security is provided at all layers from software and hardware through to physical defences – which can take another weight off your mind.

Windows Virtual Desktop is Azure exclusive – is this a problem?

Microsoft obviously hopes to increase their cloud market share by making WVD exclusive to Azure, but this decision risks deterring some businesses.

Chances are, if you’re already dedicated to a non-Microsoft cloud (Amazon, Google, IBM) for compliance reasons or because you have a strategy built around it, you won’t be willing to pick up Azure just for the sake of virtual desktops.

Since those are solid justifications, we’re not going to try to convince you to change your path. However, if you’re on the fence regarding Azure or cloud in general, here are some reasons WVD being exclusive isn’t as much of a problem as it seems.

Price

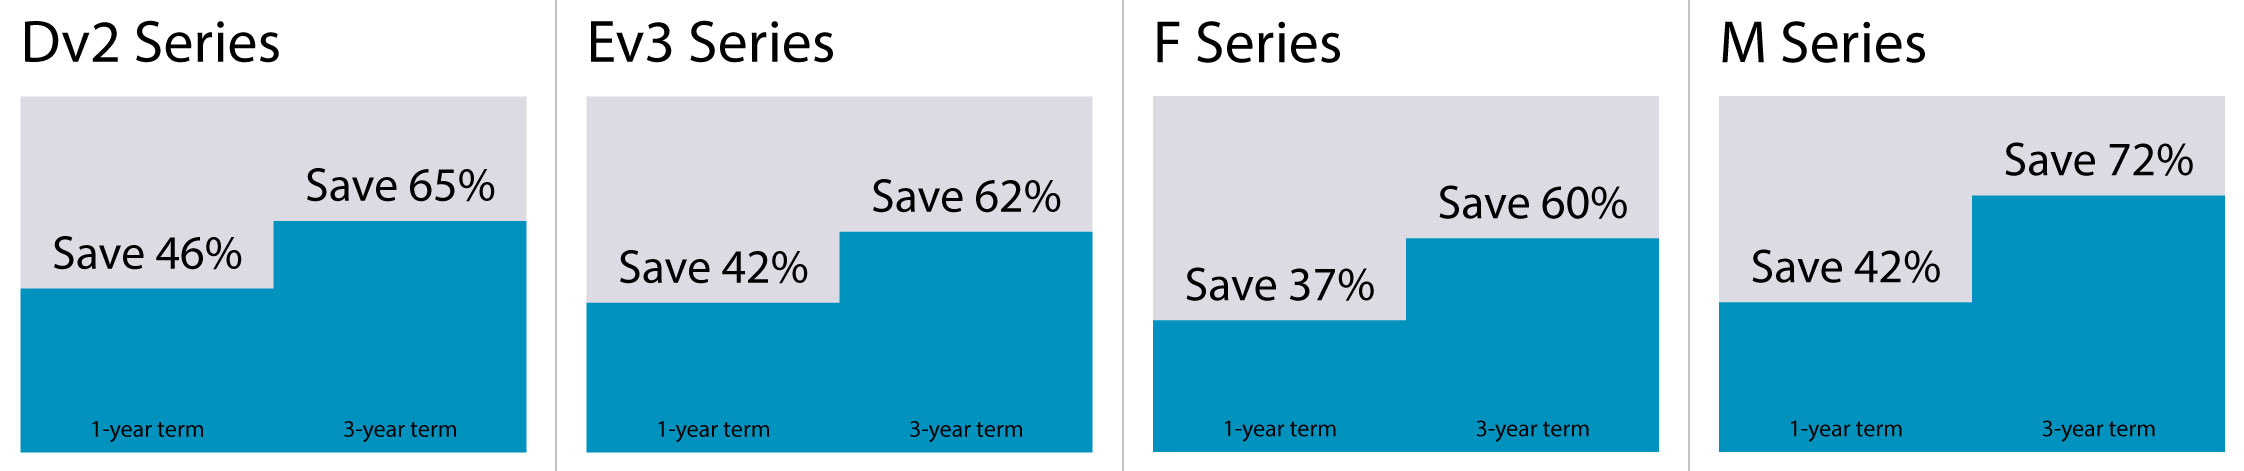
A specific objection to Azure compared to other big cloud providers is that Azure’s pricing has traditionally been prohibitive to smaller businesses without cash reserves. Azure’s pricing previously required upfront payment for the one-year or three-year reserved plans – forcing smaller businesses into the overall more expensive pay-as-you-go plan.

But Microsoft changed this in September 2019 to allow for reservations to be paid with monthly instalments rather than a single fee. For businesses without big cash reserves, this lets them set out a budget whilst also getting access to the savings a reservation provides (which can be as much as 46% for one-year reservations or 72% for three-year reservations).

Windows Virtual Desktop Azure reservation discounts

Data out of your hands

The idea of your most valuable assets and corporate secrets being held in a third party’s hands is honestly frightening for a business. However, in the case of Azure, it’s mostly an unfounded fear.

Your data is likely to be safer in Azure’s data centres than your own due to how Microsoft rigorously adheres to global security standards including ISO 27001 and constantly pours an enormous amount of money into data security.

Whilst you do still need to deploy the solution in Azure correctly for true security (e.g. multi-factor authentication and proper user permissions configuration), these are the sort of things a competent Azure specialist will have in place from day one anyway.

The truth is that this problem comes down to psychology and fear of loss of control. If you’re adhering to best practices during deployment, Azure’s security is more than enough to protect your critical assets.

Azure datacentre downtime

Another common concern with running virtual desktops in the cloud is that if the platform goes down, employees won’t be able to do any work. Azure’s downtime tracker showing a list of several recent downtime events doesn’t help alleviate fears either.

However, you should bear in mind that Azure has at least three million servers. And when operating at that scale, even with 99.99% uptime, there would be 300 servers constantly in a down state. Since there aren’t 300 servers constantly in a down state, Microsoft is doing a pretty good job of service availability.

The concern of downtime is certainly genuine, but to address it you should acknowledge that Microsoft and their army of engineers are probably more capable of managing the hardware side of a data centre with less downtime and shorter downtime windows than you can.

Having the hardware managed by Azure also takes a load off your shoulders and allows you to focus efforts towards activities which are of actual benefit rather than day-to-day maintenance.

Should you get Windows Virtual Desktop for your business?

As of now, the short answer is no. You might be surprised by that answer, but things are much more nuanced if you dig deeper.

If you’re already operating a virtual desktop environment or are an expert in Azure and VDI then yes, WVD is certainly worth reviewing. However, if you plan on using WVD as your first foray into using virtual desktops, it would be best to let it undergo a few months of fixes first.

WVD is on the bleeding edge of virtual desktop solutions right now. Whilst it shows a lot of promise and represents a lot of improvements, it needs refining before it can be considered a best-in-class solution.

Microsoft’s development cycle means it shouldn’t take too long to work out the bugs. And during that time WVD will likely gain some new and improved features – so you’ll even get some additional value for waiting.

In the meantime, upskilling your existing IT team in Azure will provide you with some decent in-house expertise. Additionally, moving to Office 365 now, if you haven’t already, gives your users plenty of time to grow accustomed to the extra features and productivity tools which are included.

What is Sway? | 7 benefits of Sway for businesses

IT solutions - What is Microsoft Sway?

What is Sway?

Sway is a presentation tool included within Office 365 which fulfills the role of a “digital storytelling application”. Sway is ideal for creating business reports, presentations or updates. Allowing users to make visually compelling, content-rich presentations without needing any serious design skills.

Sway and PowerPoint are often compared with one another. But whilst they’re both presentation tools, they both fill very different niches. PowerPoint is the ideal tool for presenting content to an audience. Whereas Sway is best used for presenting content onscreen to an individual.

What are the benefits of Sway for businesses?

Optimised for mobile:

With an increasingly mobile workforce, users need applications that can be used on whatever device they’re using. Sway is optimised for mobile devices to accommodate this. It even has a range of features which allow created sways to look just as good on a phone or tablet as they do on a desktop.

In-built mobile previews, touch-screen friendly interactions and an image focus-point customiser all contribute towards making Sway a superior presentation tool. And one which is ideal for the modern, mobile age.

This makes Sway great for sending a report to a travelling executive. Or for ensuring an important company announcement is accessible by anyone at any time. Regardless of the device they’re using.

The Sway mobile preview for images showing a desktop and mobile preview

Sway’s mobile preview is just one of the features it includes to ensure optimal performance on mobile as well as desktops or tablets.

Customisable templates:

Ensuring a consistent visual approach is integral to having a solid brand style. So, Sway’s in-built ability to save a created sway as a template to use for future documents is invaluable. This is also useful for semi-automating the creation of recurring documents such as sales reports or newsletters.

Sway has a massive range of pre-set layouts. Plus the ability to tweak these or create a new one from scratch. This lets you create a plethora of unique styles. Or find the perfect one to align with your brand’s identity.

Accessible to everyone:

Something easy to overlook but valuable nonetheless is accessibility. Sway has its own accessibility mode which lets created sways be usable by everyone.

Features like adding in alternative text for images to assist with screen readers. Or restructuring pages to a simplified layout for people with dyslexia both go a long way. And an in-built accessibility checker ensures created sways aren’t difficult to use.

Sway also has a set of free guidelines available for ensuring created sways are accessible to those with dyslexia or visual impairments. You can also use the accessibility checker to analyse the document and find issues like insufficient colour contrast. Something which can cause problems for those who are colour-blind or have low vision.

The Sway accessibility checker

An example of the suggestions the accessibility checker provides for ensuring an optimal Sway experience for everyone.

Quick import:

As well as being able to write content natively, it’s also possible to import a pre-existing document into Sway. This can be a something like a Word file or a topic outline from Wikipedia.

From there, Sway breaks the document down into its main components. A headline, titles, body text, images and tables for example. And displays it in your sway.

Sway can then takes this a step further, adding in a few extra touches. These additions are only cosmetic such as text extracts. But they vastly improve the visuals of the document.

Once you import the document, it can still be edited to get it to your liking. But from experimentations, Sway tends to do an already good job of presenting imported content.

Accessible anywhere and shareable with anyone:

Sway stores created sways in the cloud. Meaning that you can view any sway you want as long as you’re connected to the Internet and have access permission. This does have the downside of meaning that whilst offline, you won’t be able to access any sways. But for the increased flexibility offered by a cloud approach, it’s a worthwhile trade-off.

Being stored online also has the advantage of simplified sharing. The types of documents you make in Sway are meant to be shared. Whether that’s with only a few as with a report or many people as with a newsletter.

Having no need to upload or download any files and fiddle with versions is great. Considering that sways are often packed with rich media or images. You also get to avoid long transfer times due to a large file size because your sways are stored centrally.

Rich content:

Sway allows users to insert content from a variety of sources to enrich their presentation. Flickr, Bing Images and Pickit all offer a variety of images under the Creative Commons licence. Letting you use them freely as backgrounds or features within the sway.

Additionally, you can embed YouTube videos, tweets and Facebook posts into sways. Allowing for easy viewing and no need to link out of the presentation for content which is on another platform.

Of course, you can also embed any images or videos you already have into the sway. Either via OneDrive or by inserting the file into your presentation.

An example of the image import via Bing

In addition to images, Sway allows users to easily import videos, social media snippets and other rich media.

Slick presentation:

A major issue with PowerPoint presentations is that they can seem unprofessional or lack finesse. Which in turn reflects poorly on your business. Likewise, Word documents are difficult to organise and are often visually sparse. Sway on the other hand is built with elegant design and impressive visual performance in mind.

Through using the pre-made templates and styles – or creating your own – it’s simple to create a presentation which looks good and impresses your client or manager.

How to get Sway for your business

If you’re interested in getting Sway, it’s included for free within certain Office 365 licenses. If your business is yet to adopt Office 365, discover some of the great features you’re missing out on.

Other articles in this series:

What is Microsoft Teams? | 7 benefits of Teams for businesses

IT solutions - What is Microsoft Teams?

What is Microsoft Teams?

Microsoft Teams is a cloud-based chat and collaboration platform, designed to simplify and streamline communication between employees by offering one centralised place to connect.

Instead of relying on clunky email chains, employees can send direct messages to co-workers, set up group chats or organise video, audio and web conferences, all without leaving the platform.

But Teams is more than just a communication tool (something valuable enough on its own) as it also has the following features natively integrated:

  • A central hub for quickly accessing and sharing your files
  • The core of the Office Online suite for seamlessly accessing and collaborating on documents
  • Its own calendar for setting up meetings and ensuring projects stay on track
  • And optional integrations (called Connectors) with third-party applications ranging from Salesforce to GitHub to MailChimp.

Should I use Teams or Yammer?

With there being so many collaboration tools in Office 365, it’s easy to be overwhelmed by the range of options available. At an incredibly basic and simplified level, you should use Teams for sending messages to individuals or smaller, more tightly knit groups and should use Yammer for sending a message or announcement to large groups of people or the whole company.

Be aware that this comparison only looks at using Teams’ and Yammer’s messaging functions. When comparing each program as a whole, it’s apparent that they both fulfil very distinct roles outside of their chat features.

For maximum business impact, you should be using both Teams and Yammer because each one offers various exclusive features the other does not. However, to determine which program to use when sending a message, the above breakdown is a good rule to follow.

What are the benefits of Teams for businesses?

Centralised access to files:

The core Office file editors (Word, Excel, OneNote and PowerPoint) are all accessible through Teams and files can be opened, edited and shared in a seamless experience without ever leaving the app. Additionally, files stored in OneDrive can be viewed and shared within Teams.

With the addition of plugins, the viewing feature can be extended to support additional file formats such as Photoshop, Illustrator and other programs in the Adobe suite.

By having the ability to natively work with content, workflows can be streamlined and users can collaborate much easier on documents. By improving the efficiency of your work, you can do more with less time and then utilise Teams’ innate sharing features to make sure what you’ve made gets in front of the right people.

Live, threaded chats:

Unlike email chains or sporadic messages sent over a range of channels, Teams utilises threaded, persistent chats for communications. This means that people can easily go through the history of a conversation in order to understand the context of what’s happening or double-check what has been said. Additionally, adding in new members to a chat allows them to immediately see a history of events, communications and decisions without having to play catch-up.

Having a live chat also leads to far more spontaneous and active communication. Unlike with emails where a question can sit unanswered for days, the directness of Teams means it’s much simpler to respond to messages which in turn increases collaboration between co-workers.

An example of a Teams chat between two people.

Teams chats allow employees to quickly exchange information and collaborate with one another on projects.

Bots and automation:

A multitude of bots are available in Teams which fulfil a variety of helpful roles. T-Bot acts as an interactive help feature where you can pose questions about using Teams. StatsBot automatically compiles reports based on data from sources such as Google Analytics or Salesforce and PollyBot lets you create polls for your co-workers.

Many bots are available through the in-built ‘store’ and offer further integrations and functionality to Teams.

Highly integrated:

Teams is naturally integrated with other apps in the Office 365 suite such as Skype for Business, Outlook, OneDrive and OneNote. Enabling video and voice calls, meeting scheduling, file sharing and note-taking to be done inside the app.

The file hub aspect of teams also supports integration with cloud storage outside of Microsoft’s own OneDrive, with it being possible to link Dropbox, Box, ShareFile and Google Drive accounts. And on top of all that, Teams also features third-party connectors which provide integrations for external programs ranging from Adobe Creative Cloud to Google Analytics.

Some of the optional integrations for Teams including Adobe Creative Cloud, Aha!, Airbrake, Aircall and +BI Collaboration.

Teams supports an array of third-party applications which improve what users can do and share within Teams.

Synced with your Microsoft account:

Teams includes its own calendar (found under the meetings tab) where meetings can be scheduled, viewed and edited. What makes this particularly valuable is that the calendar is synced with Outlook’s own calendar. Meaning any meetings made in Teams will appear in Outlook and vice-versa. Teams is also synced with your OneDrive (found under the files tab), allowing you to easily share and collaborate on any document.

These simple integrations lead to a far more cohesive work experience, lead to less duplication and mean you can still use the tools you’re familiar with whilst also benefiting from the range of benefits Teams brings.

The teams calendar

The Teams calendar is synced with your Outlook calendar to let you effectively schedule meetings.

Security built-in:

Like the rest of the Office suite, Teams is highly cyber-secure. The software is built to ISO 27001, ISO 27018, SOC 2 and HIPAA standards to keep it regulatory compliant. Additionally, encryption is used for data both in transit and at rest, preventing information from being intercepted and a resulting data breach.

Versatile application:

Teams is available on both Windows and iOS desktops, plus has a mobile application for Android, Apple and Windows phones. Furthermore, Teams is accessible through any of the standard web browsers, meaning it can be used without needing to install the dedicated application.

Because Teams is available on such a range of platforms – regardless of your business’ current hardware setup, Microsoft Teams will be able to provide value for your business. Moreover, the addition of the mobile applications means remote workers or employees who are often travelling between sites gain just as much value (if not more due to being kept in-the-loop much more readily).

How to get Teams for your business

If you’re interested in getting Microsoft Teams, it’s included freely within certain Office 365 licenses. If your business is yet to adopt Office 365, see our blog post on the topic to discover some of the great features you’re missing out on.

If you already own Teams but want to get more from it, also check out #10SecondTeamsTips where genuinely useful advice and features are highlighted.

Other articles in this series:

What is Delve? | 7 benefits of Delve for businesses

IT solutions - What is Microsoft Delve?

What is Delve?

Delve is a file hub, collaboration space and enterprise social network built using the Microsoft Graph and included in Office 365.

When trying to boil down a complex piece of software into its core functions, sometimes words fail to convey enough information. So if that previous description didn’t mean anything to, here’s an analogy instead: Delve is like a cupboard which intelligently and automatically fills itself with things from other cupboards. You might have the people cupboard where you store your co-workers (not literally, just their details), your file cupboard where you store your documents and a sharing cupboard where your co-workers put files they want you to have access to.

Whenever you open the main cupboard, Delve fills it with documents it thinks will be useful to you based on a range of criteria. If what you want isn’t in there, you can filter the contents of the cupboard to find it, otherwise, you can take out your file and get to work. Alternatively, you can look for people in the main cupboard and Delve will fill it with your co-worker’s details, a personal bio and other important information about what they’re doing and how to contact them.

Whilst the cupboard analogy may not be perfect, it hopefully gives you an idea of what Delve is for. If the cupboard analogy has failed you, then perhaps describing Delve as the online, cloud-enabled File Explorer v2 will fare better.

It’s important to note that a common concern with Delve is that it since all your files are accessible through Delve, all your files are surely stored on a Delve server. This is not the case. Going back to the cupboard analogy, when you open the main Delve cupboard all your files appear inside but are still in their respective cupboards. The Delve cupboard is simply a collation of the sources of your files and a collection of links to the sources. This means security or regulatory concerns over files being stored on an external Delve server can be dismissed.

What are the benefits of Delve for businesses?

Privacy as default:

Unlike social networks such as Facebook where the default is to expose all your pictures and posts to your social group, Delve keeps things private unless you specify you want the content to be shared. Granular control is given to users, allowing them to dictate who gets to see their files, keeping company information safe.

By default, a file on Delve has the same access permissions to where it’s stored. For instance, if you have a file stored on a private folder, only you will be able to see and access it through Delve. Alternatively, if you have a file stored in a shared OneDrive folder then only you and the people the folder is shared with will be able to see and access it.

Files are private documents by default

Files and other sensitive information is kept private by default.

A cloud application:

Delve is accessed through a web browser such as Chrome, Safari or Edge which means as long as you have an Internet connection, you can access the program. This is particularly valuable for remote workers as they gain just as much value from the software as an in-office employee does.

Boards:

Boards is a feature in Delve that works much like a tagging system. Clicking the little stack icon underneath a document allows you to add it to a board of your choosing. This system of using tags instead of folders gives Delve two distinct advantages:

  • Firstly, it allows for a document to be in two places at once without having to create a copy of the file – improving navigation speeds, enabling more logical file storage and making it easier to access important files.
  • Secondly, it prevents long folder chains which are often slow to navigate and can be awkward to use when trying to find a single specific file.
An example of a board containing some files

Boards allow files to be sorted and located much easier and allow for collaborative areas where many people can contribute files to a project

User profiles:

The enterprise social media platform aspect of Delve comes through most prominently in its user profile section. Profiles allow Delve users to include their contact details, a short bio, a list of projects being worked on, skills and expertise, schools and education and interests and hobbies which combine to give a good idea of the person whose profile you’re looking at.

Whilst the value of this feature for a large business is clear, in a small business where everyone knows each other it may not seem so useful. However, there are many cases where it comes in handy. The projects and skills and expertise sections in particular can be used to find out what everyone is currently working on as well as who would be the best person to ask for advice if you need help with your own projects.

An example of what users can enter about themself. contact details, a bio, projects, skills and expertise, schools and education and interests and hobbies

Users can enter a variety of information about themselves on their profile.

Built on the Microsoft Graph:

Microsoft Graph is a collation of activities and content collected from user actions across the Office suite. It allows for more personalised content to be displayed and syncs data across multiple Microsoft programs.

This means that using Delve alongside other Microsoft products provides further advantages and integrations. For example, Yammer conversations can appear in the list of content cards and can be pinned to your own boards and your recently accessed files appear more prominently on your documents page of Delve.

By integrating the data and user actions from across multiple programs Delve is able to provide a more personalised user-centric experience.

Intelligent search:

Rather than just looking at a document’s title, the search feature in Delve additionally scans the contents of a document for your search terms as well. This is particularly useful for when searching for a document someone else has made and shared with you, but you don’t know the title of.

Delve’s search function also lets you search by people, allowing you to look at their profile and see any documents they have shared with you alongside their details.

How to get Delve for your business

If you’re interested in getting Delve, it’s included freely within certain Office 365 licenses. If your business is yet to adopt Office 365, see our blog post on the topic to discover some of the great features you’re missing out on.

Other articles in this series:

What is Yammer? | 8 benefits of Yammer for businesses

IT solutions - What is Microsoft Yammer?

What is Yammer?

Yammer is Microsoft’s take on a Facebook-esque social platform tailored for use in a business environment. Before you take this parallel too literally, it’s important to add that using the Facebook comparison brings some unwanted connotations and further clarification is needed to get a genuine picture of what Yammer can do for businesses.

Yammer, unlike Facebook, is a private social platform and the scope of the network is, rather than the whole world, just your organisation. The Facebook comparison works strongest when it comes to Yammer’s user interface and feature set, with many users likely finding familiarity in the layout and tools which are given to them: instant messaging, an update feed, @mentions, likes, groups, polls, hashtags, and announcements.

For the full picture, it’s also important to state that Yammer is one of the enterprise tools included within Office 365 and is a self-described “outer-loop” communication tool. Allowing users to engage with co-workers they rarely see or talk to from across the organisation.

Should I use Yammer or Teams?

With there being so many collaboration tools in Office 365, it’s easy to be overwhelmed by the range of options available. At an incredibly basic and simplified level, Yammer is for sending a message or announcement to large groups of people and Teams is for sending messages to individuals or smaller, more tightly knit groups.

Of course, this dichotomy only looks at using Yammer’s and Teams’ messaging functions and when comparing each program as a whole, it’s apparent that they both fulfil very distinct roles outside of their chat features.

For maximum business impact, you should be using both Yammer and Teams because each program offers various exclusive features the other doesn’t. However, to determine which program to use when sending a message the above breakdown is a good rule to follow.

What are the benefits of Yammer for businesses?

Builds better relationships

By enabling continuous communication, Yammer lets employees feel more connected and unified, even if they’re in different departments or office buildings. This helps them create stronger teams and makes working towards a common goal far simpler.

Additionally, through utilising group announcements and Yammer’s in-built praise feature, the latest achievements of staff members can be celebrated by everyone. Allowing a well-performing employee to be acknowledged for their hard work.

An example of Yammer's praise feature

The praise feature allows employee achievements to be celebrated.

Effective knowledge sharing

Employees can gain meaningful answers to important questions by quickly and easily communicating with colleagues. Whether it’s asking for some details on a client, double-checking a meeting time or getting advice from more experienced staff, it can all be done through Yammer.

Improves employee engagement

By giving every employee the ability to be involved with company discussions, Yammer lets people feel more engaged with their company. More engaged employees are more productive, less likely to be distracted and are more likely to stay with the business. Making Yammer a powerful tool to have.

Yammer also has a multitude of options for engagement, including opinion polls, open questions and casual public chatrooms for a Friday afternoon.

A Yammer poll

Polls can help improve employee engagement and provide feedback on how to improve the business.

Familiar layout

Many pieces of software are obtuse and require long periods of time to learn how to use effectively. Yammer on the other hand is instantly familiar to anyone who has used Facebook, Twitter or any type of online chatroom.

With a gentle and short learning curve, Yammer delivers immediate value to any business and sustains this value throughout its lifetime through the power of its many features.

Live communication

Yammer allows for departments and offices to communicate with one another in a far more effective way than traditional communication tools. Email and board-room meetings have their uses but often aren’t sufficient or suitable.

Yammer uses more social-media-esque features to provide an instant and streamlined discussion between groups or individuals. Allowing teams to stay connected and fostering continual discussion to keep employees engaged.

A Yammer message and private messaging

Messaging is far more versatile and streamlined compared to email or meetings.

Versatile application:

Yammer is not only available for Windows, but also for Mac, Android and iPhone. Furthermore, Yammer can be accessed via any standard web browser, allowing employees to access the software without needing the dedicated application installed.

Being available over so many platforms and devices means that, regardless of your current hardware setup, Yammer provides value for your business. The addition of mobile applications also means just as much value is gained by remote workers or employees who are often travelling between sites.

Highly Integrated:

Yammer has integration capabilities with many other Office applications such as SharePoint and Skype for Business as well as external applications including Salesforce. It’s also possible to create custom integrations using the Yammer API.

In-built analytics:

Yammer has its own in-built analytics platform, enabling users or admins to monitor certain metrics such as how many messages are being posted, how many messages are being read and how active group members are.

This data can be used to check if everyone in the company saw an announcement or find out which groups are most popular with members for example.

Yammer analytics

Analytics show how employees are using the software and what benefits it’s bringing.

How to get Yammer for your business

If you’re interested in getting Yammer, it’s included freely within certain Office 365 licenses. If your business is yet to adopt Office 365, see our blog post to discover some of the great features you’re missing out on.

Click here to subscribe to the QuoStar Insight Newsletter


Blackberry Priv review

Having my new Blackberry Priv is like having a long-lost dog return home. I’ve always been a fan of Blackberry devices in the past, typically due to the security of the devices – they were and still are miles ahead of any of the competition. The built-in keyboards were also excellent and after a couple of days getting used to it you are back, thrashing emails out at almost a desk-based pace.

blackberry priv

I’ve taken some stick over my new device; asking why I’ve got a Blackberry, etc…  I simply ask them why people stopped using Blackberry devices in the first place? You don’t get an answer straight away so I generally state that Blackberry dropped off the face of a cliff predominately due to their application store. It was bad. There were so few applications that the end-user felt they were missing out. In short, Blackberry deserved to really suffer, locking down your hardware and software long-term is a very risky business.

I believe Blackberry has made some smart moves as a business, in terms of development and acquisition. Moves which could see them rise from the ashes and place a flag on that empty hill – the business mobile space. None of the players, with exception of Microsoft, have really started to scale it. It was left empty after the Blackberry collapse. It’s there for the taking but they haven’t got long. This will very likely be the end of their hardware business if they can’t turn a profit on the PRIV. If this does happen their patents and software will live on.

So, after a week of use here’s my view on the BlackBerry PRIV:

Phone Hardware

The device looks smart and has a quality feel to it. You feel that it’s on a par with the Samsung Galaxy and iPhone devices in terms of build quality. The addition of a slide-out keyboard is a real productivity enhancer for the new user and the old Blackberry fan. It’s all balanced, is comfortable in weight and can’t be faulted. If you don’t like to use a hard keyboard you aren’t sacrificing anything with its presence and there’s a really smart on-screen option also built-in. However, with a little bit of practice, you’ll appreciate the physical one.

Battery

I’ve been using my Blackberry PRIV for a couple of days and have just plugged the device in to charge with 4% left.  If you don’t play games, go hard on Facebook or sit on Twitter for hours you’ll drag out the battery for longer.

Operating System

Android is a decent mobile platform. It’s one of the big two, with the other being Apple’s IOS. I’m new to it but I haven’t had any issues getting to grips with it on the Blackberry. I guess you can look at the Blackberry as Android with a titanium shell – you get all the benefits of the mobile operating system plus robust security out of the box.

I do get the initial Android first move by Blackberry – it gets the numbers up faster. Personally, I’d have preferred it if they’d gone for Windows, as I’ve had Windows devices for over three years and really liked the operating system on the Nokia Lumia devices. Going forward Windows 10 is going to drive more and more application developers onto the platform. The seamless integration with business applications is making it a real player, especially in the corporate market. If the PRIV is a success I believe you’ll see Blackberry hardware devices using the Windows platform in the future, if not then you’ll see Blackberry’s software and hardware patents being licensed further into other manufacturers.

Applications

The Blackberry PRIV comes with all of the applications you can get from the Google Play store, the same as any other Android based mobile device, but with some of your old favourites from the Blackberry stable – such as Blackberry Hub, email, BBM, calendar, etc. All of these applications have been ported over perfectly. Hub is a great content aggregator, as it lets you see all of your emails, MMS messages, WhatsApp messages and BBMs in a single stream, rather than hopping between various applications.

Out of the box Security

On the surface, the Blackberry PRIV does look like any normal Android phone, but as you start to use it you start getting hints on how security is still the major focus of the brand. One of the first things I noticed was an application called DTEK – a quick and easy summary of the security situation in relation to your device. The application monitors applications and processes in real-time and gives you a clear security score. Simple, straightforward and easy to understand for any user.  The system continually monitors and reports, so once set you don’t need to keep checking your security status. It’s great for peace of mind for those without vast IT security teams yet deal with sensitive information.

Enhanced Security in the Enterprise

In a business with a significant number of mobile users or those with greater security requirements, you should manage and control mobile devices centrally to ensure compliance. Thankfully this has always been an area where Blackberry excells, they are still years ahead of the other players. When the PRIV is managed by BES (Blackberry Enterprise Server) we really are getting back to gaining granular control of security again. Some key features include layered defence, hardware root of trust, Blackberry secure compound, secure boot, Blackberry integrity detection, kernel hardening, encrypted user data and BES12 activation types.

Summary

Buying a mobile device is like buying a car – it’s so personal. Blackberry certainly seem to have released a high-end, functional device that will also give the end-user the freedom they require, if you wish to allow it. I’m reviewing this phone for business, but obviously, you have to take into account casual personal use. Finally, Blackberry has grasped the nettle, it shouldn’t be too late.

I like the PRIV,  I really like it. As you can probably tell I am missing the Windows operating system from my old Lumia. However that will pass in a few days (it always does) and the additional security functions are worth it, and they don’t impact productivity at all. If you are an Android user you’ll be happy with the PRIV. You will find it easy to switch from a Samsung Galaxy or similar device. If you are a Windows mobile or an iPhone user it’s an easy swap too. It’s a serious business device and shows you take security seriously.

Ultimately I believe Blackberry’s success rests more on their marketing capabilities than their hardware or software. This will be the decider of success or failure. In the long term. If you buy the PRIV now you won’t be risking anything. You’ll have a smart, functional device in your pocket that you can feel comfortable with in terms of security.

NEXT>> An easy guide to managing multiple devices and apps for IT teams

First impressions: A review of Veeam Endpoint Backup FREE

veeam endpoint backup free review

So with the release of Veeam Endpoint Backup FREE imminent (yes the word ‘FREE’ is part of the product name), I thought I would write a blog about my experience of using the beta version of the product. It’s quite a long blog, so bear with it as it does cover all the aspects of the product.

Overview

I have had a long relationship with Veeam Backup and Replication, I have used it since its initial release, mainly in managed cloud environments and have seen the product grow into what it is today. One element I always felt they missed was the protection of physical endpoints. I know the argument is that in today’s cloud infrastructures and data centres there is no room for physical servers. But realistically there are a number of businesses that have physical servers, even when they have virtualised their servers and business applications.

An example of such is vCentre server (again V or P is an argument for another day), one domain controller, and the backup servers. I certainly keep my backup servers physical with direct SAN access so as not to add additional I/O to some of my infrastructures. So to be able to back up the few physical servers I have and keep myself aligned to a single backup and recovery vendor is ideal.

Installation process

I won’t go through the whole installation process as it is a typical next, next, next affair and with a couple of questions thrown in. The product likes you to create bootable recovery media from the outset. I chose not to do this whilst installing the product for the lab and instead carried on without it.

To create the media later you need to run the ‘Create Recovery Media’ application – one thing I would like to see is a link from the main console to this. I saw from the console a warning that I did not create recovery media but it offered no link to launch the ‘Create Recovery Media’.

As with every product you have the prerequisites of minimum RAM, CPU etc… see below

  • Windows 7 SP1+
  • Windows Server 2008R2 SP1+
  • 2GB RAM+
  • 150MB of Disk Space
  • .Net Framework 4.0
  • SQL Server 2012 Express LocalDB

Backup options

At installation, you have the option to be guided through your backup configuration but if you choose to configure later you can set it up manually.

To access the application you will see a new system tray icon as shown in Fig1

Fig1

fig_1_Veeam_endpoint_backup

You can either double-click the icon and see the console page as shown in Fig 2 and click the link ‘Configure Backup’ or you can right-click on it and choose from the pop-up menu. ‘Backup – Configure Backup’.

Fig2


Backup options are

  1. Entire Computer
  2. Entire Volume
  3. File Level Backup

Destination options

  1. Local Drive
  2. Shared Folder (Network)
  3. Veeam Backup and Replication Repository

The Veeam Backup and Replication Repository is not available in the beta but will be in the general release. This is the icing on the cake for businesses using Veeam Backup and Replication. When I first started looking at the product I made a wish list, one point being the ability to monitor and alert on EndPoints through Enterprise Manager. Well, with the General Release by choosing the option of repository for your backup destination you can. This stops it being a disjointed product and integrates nicely into our already existing backup infrastructures.

Schedule options

Now I really like the options here and have tested all of them. One option I really think stands out is ‘At Backup Storage Attach’. For a desktop solution this can work very well if you have an external USB drive, as when you attach it, it automatically runs your backup. That’s great, as no schedules and missing backups are incurred because a drive isn’t attached during a typical window.

All options are

  • Daily on a schedule – Typical backup solution
  • On Lock – Tested and worked fine
  • On Log off – Tested and worked fine
  • At Backup Storage Attach – I tried this extensively and it worked really well. I even tried to attach different USB storage to make sure it logged the exact media it should use. Even when I used identical USB storage it worked perfectly, only recognising the USB storage it should of.

I also loved the fact you could tick b, c, and d and providing an option to not back up any more than within a predefined period. For example, you can configure the backup to run at lock or when storage is attached, but only if two hours had elapsed since the last backup.

Retention

Retention within EndPoint Backup works similarly to Backup and Replication, i.e. we set restore points to build a chain of files. This is the incremental forever technology that Veeam is so well known for and very good at. Our chain will only ever contain one full backup and all our subsequent backups will be incremental. When we go past our restore points rather than trailing the full they are injected into the full backup file and removed. This allows us to only require one full backup that is taken the first time and this dramatically speeds up the whole backup process. There is a lot more to this technology but I think it would deserve a blog of its own.

One thing to be aware of here is that the retention is the number of restore points, not days. For example, if I set 7 restore points and backup every hour, on the eighth hour the first restore point will no longer be available. So depending on your backup frequency, retention requirements and available disk space this needs to be thought through.

My initial backup was over USB2 to a USB drive and the machine being backed up had a 238GB drive, 52.3GB of this was used space. The backup file size on disk was 27.1GB, so it’s not bad compression at approximately 48%. It took 31 minutes to complete, so over USB that’s acceptable.

Other settings

Other settings that you can access through the console to control backups are on the settings tab as below.

The setting I was interested in testing on this tab was the throttling of backup activity whilst the system was busy. So I set up my machine to perform a backup and I then used a CPU load generator to mimic a heavily utilised system.

I started the backup and saw VeeamAgent start using approx. 15% CPU I then slowly loaded the CPU until my CPU was running 100%. The VeeamAgent was at this point only utilising 0.01% I then released the processor. The VeeamAgent then again increased to 15% CPU utilisation and the backup continued to run. I, therefore, know I don’t have to be too conservative in scheduling when the backups run as it shouldn’t really affect other applications.

Restores file and volume level

So after backing up our EndPoint machine, the next tests were to look at the restore options and the process.

There are two ways to perform a restore. The first is that if you click on the backed up job in the console you want to restore from, you see details about that particular job and options to restore depending on the job you carried out. See below Fig3.

Fig3

The alternative option is to use the installed applications called ‘Volume Level Restore’ or ‘File Level Restore’ from the Windows Start Menu.

The difference here is if you restore by navigating through the job itself you will be presented with the backup files or volumes to restore. If you choose to open the application you need to then browse to the backup files and select them. This will then take you through a wizard before opening the backup set in the familiar ‘Backup Browser’ window.

To restore a file you simply browse to it and select ‘Restore’ you can then choose to replace any existing file or keep both. Another option is ‘Copy To’ allowing you to output to an alternative location.

Bare metal restore

Another recovery option is to restore using the Bare Metal option by utilising the recovery media created. I chose to do this and restore it into a Hyper-V environment. By doing this I was mimicking the use of different hardware to the Windows operating system.

So, I booted from the ISO and was presented with a Veeam EndPoint Recovery Screen. On this screen you have three options;

  • Bare Metal Recovery
  • Windows Recovery Environment
  • Tools

To start I clicked on Tools and this expanded my choices;

  • Command Prompt
  • Memory Diags
  • Reset Password
  • Startup Repair
  • Load Driver
  • Exports Logs

This recovery media is very useful, especially ‘Reset Password’. I didn’t test it here as I didn’t yet have a Windows Installation in the Hyper-V platform. I then moved back to the previous screen and began the Bare Metal Restore.

The first thing you need is access to the backup files from which you will restore. This was tricky in my case as I was using Hyper-V to test and so couldn’t pass through my USB drive. I had to share it from the host and connect to the network.

The options when performing a bare metal restore are local disk and network storage.

Once you have presented the backup files you can select what you wish to restore.

Select the backup you wish to restore and click next then select the restore point you want and click next again.

You then have three more options

  • Entire Computer
  • System Volumes Only
  • Manual Restore

The manual mode instantly drew me in as this gave the ability to resize volumes and partitions. As I was using Hyper-V I purposely made the drives smaller than the machine I backed up. But big enough to take the restored backup. So off I went with the manual restore but instantly hit a wall I couldn’t restore my 238GB volume to a 60GB disk, even though there was only 50GB of data in the volume. It seemed I needed to match this size in order to perform a restore. This is something I think Veeam should allow as it is common to have different size drives.

So I shut down and resized my disks, with the machine now provisioned with a thin provisioned disk I restarted the restore process once again. Hooray, we are now working and I have the option to ‘Run Now’. Once the restore is running you are presented with a progress screen as it restores each partition. See Fig4.

Fig4

The whole process took about ninety minutes and when I booted the virtual machine after completion it worked perfectly.

Conclusion

Given this is a Beta version I thought it was going to be a little buggy but it’s pretty solid.

It’s a free product, and as the general release will integrate with Veeam Backup and Replication using repositories you can’t ask for much else. I think what Veeam have done here is very clever as by giving the product away will mean it many will adopt it where people use other vendor software. You need to understand it’s by no means a full replacement to a physical server backup solution mainly as there is no official support, but it does aid in the protection for those of us who swear by virtualisation and have those token physical servers. It’s also great for desktops or laptops especially if they are all backing up centrally to your repositories.

I hope that Veeam does look to improve the product and maybe bring a paid for version that would include encryption, deduplication and multiple backup schedules. The icing on the cake for this product from my opinion would be to enable it to backup to Veeam Cloud Connect so that it protects those mobile users everywhere they go back to a central repository.

All in all another great product, well done Veeam, keep up the good work!

Dan Mulliss

NEXT>> QuoStar launches Veeam Cloud storage