
Blog


So with the release of Veeam Endpoint Backup FREE imminent (yes the word ‘FREE’ is part of the product name), I thought I would write a blog about my experience of using the beta version of the product. It’s quite a long blog, so bear with it as it does cover all the aspects of the product.
I have had a long relationship with Veeam Backup and Replication, I have used it since its initial release, mainly in managed cloud environments and have seen the product grow into what it is today. One element I always felt they missed was the protection of physical endpoints. I know the argument is that in today’s cloud infrastructures and data centres there is no room for physical servers. But realistically there are a number of businesses that have physical servers, even when they have virtualised their servers and business applications.
An example of such is vCentre server (again V or P is an argument for another day), one domain controller, and the backup servers. I certainly keep my backup servers physical with direct SAN access so as not to add additional I/O to some of my infrastructures. So to be able to back up the few physical servers I have and keep myself aligned to a single backup and recovery vendor is ideal.
I won’t go through the whole installation process as it is a typical next, next, next affair and with a couple of questions thrown in. The product likes you to create bootable recovery media from the outset. I chose not to do this whilst installing the product for the lab and instead carried on without it.
To create the media later you need to run the ‘Create Recovery Media’ application – one thing I would like to see is a link from the main console to this. I saw from the console a warning that I did not create recovery media but it offered no link to launch the ‘Create Recovery Media’.
As with every product you have the prerequisites of minimum RAM, CPU etc… see below
At installation, you have the option to be guided through your backup configuration but if you choose to configure later you can set it up manually.
To access the application you will see a new system tray icon as shown in Fig1
Fig1

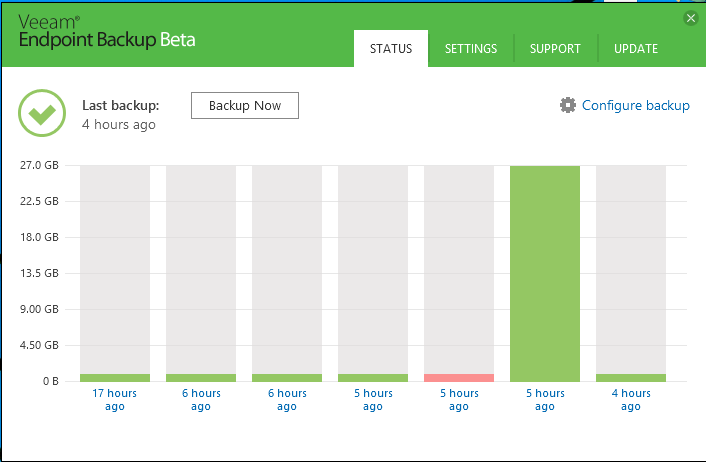
You can either double-click the icon and see the console page as shown in Fig 2 and click the link ‘Configure Backup’ or you can right-click on it and choose from the pop-up menu. ‘Backup – Configure Backup’.
Fig2
The Veeam Backup and Replication Repository is not available in the beta but will be in the general release. This is the icing on the cake for businesses using Veeam Backup and Replication. When I first started looking at the product I made a wish list, one point being the ability to monitor and alert on EndPoints through Enterprise Manager. Well, with the General Release by choosing the option of repository for your backup destination you can. This stops it being a disjointed product and integrates nicely into our already existing backup infrastructures.
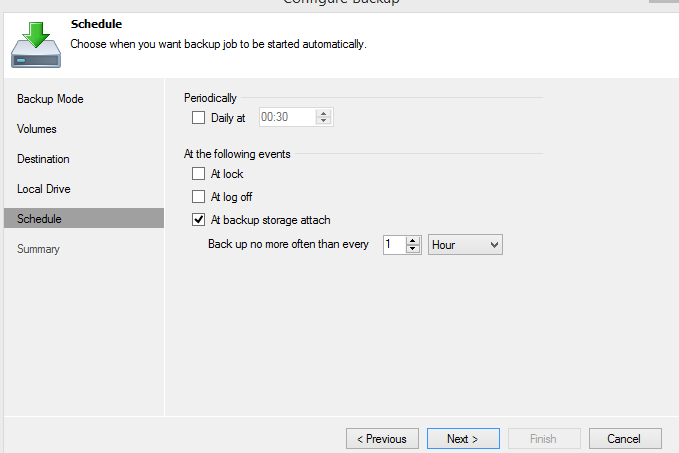
Now I really like the options here and have tested all of them. One option I really think stands out is ‘At Backup Storage Attach’. For a desktop solution this can work very well if you have an external USB drive, as when you attach it, it automatically runs your backup. That’s great, as no schedules and missing backups are incurred because a drive isn’t attached during a typical window.
I also loved the fact you could tick b, c, and d and providing an option to not back up any more than within a predefined period. For example, you can configure the backup to run at lock or when storage is attached, but only if two hours had elapsed since the last backup.
Retention within EndPoint Backup works similarly to Backup and Replication, i.e. we set restore points to build a chain of files. This is the incremental forever technology that Veeam is so well known for and very good at. Our chain will only ever contain one full backup and all our subsequent backups will be incremental. When we go past our restore points rather than trailing the full they are injected into the full backup file and removed. This allows us to only require one full backup that is taken the first time and this dramatically speeds up the whole backup process. There is a lot more to this technology but I think it would deserve a blog of its own.
One thing to be aware of here is that the retention is the number of restore points, not days. For example, if I set 7 restore points and backup every hour, on the eighth hour the first restore point will no longer be available. So depending on your backup frequency, retention requirements and available disk space this needs to be thought through.
My initial backup was over USB2 to a USB drive and the machine being backed up had a 238GB drive, 52.3GB of this was used space. The backup file size on disk was 27.1GB, so it’s not bad compression at approximately 48%. It took 31 minutes to complete, so over USB that’s acceptable.
Other settings that you can access through the console to control backups are on the settings tab as below.
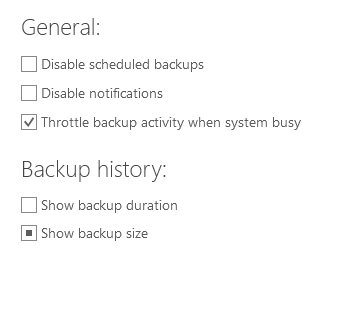
The setting I was interested in testing on this tab was the throttling of backup activity whilst the system was busy. So I set up my machine to perform a backup and I then used a CPU load generator to mimic a heavily utilised system.
I started the backup and saw VeeamAgent start using approx. 15% CPU I then slowly loaded the CPU until my CPU was running 100%. The VeeamAgent was at this point only utilising 0.01% I then released the processor. The VeeamAgent then again increased to 15% CPU utilisation and the backup continued to run. I, therefore, know I don’t have to be too conservative in scheduling when the backups run as it shouldn’t really affect other applications.
So after backing up our EndPoint machine, the next tests were to look at the restore options and the process.
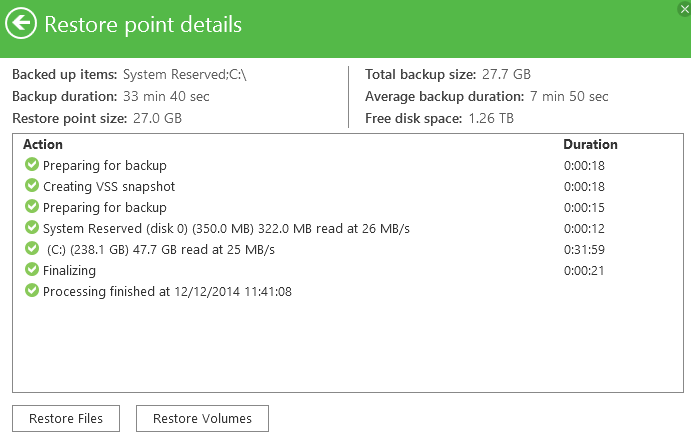
There are two ways to perform a restore. The first is that if you click on the backed up job in the console you want to restore from, you see details about that particular job and options to restore depending on the job you carried out. See below Fig3.
Fig3
The alternative option is to use the installed applications called ‘Volume Level Restore’ or ‘File Level Restore’ from the Windows Start Menu.
The difference here is if you restore by navigating through the job itself you will be presented with the backup files or volumes to restore. If you choose to open the application you need to then browse to the backup files and select them. This will then take you through a wizard before opening the backup set in the familiar ‘Backup Browser’ window.
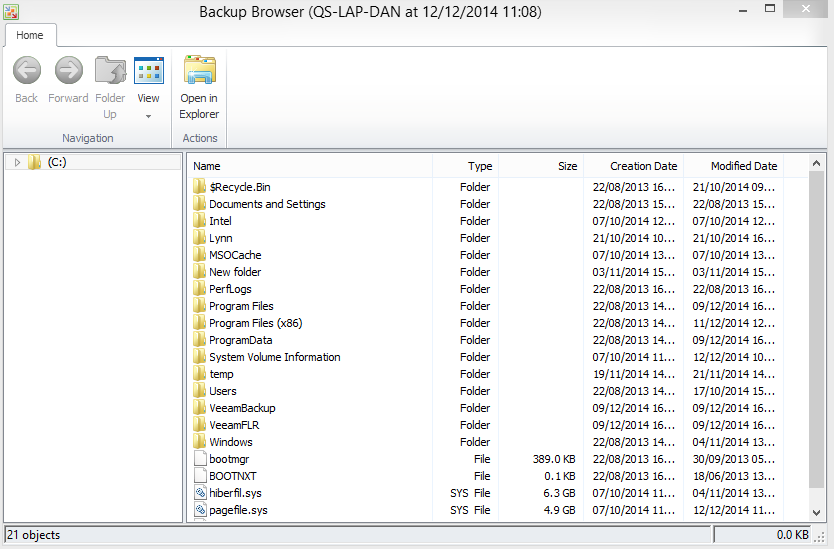
To restore a file you simply browse to it and select ‘Restore’ you can then choose to replace any existing file or keep both. Another option is ‘Copy To’ allowing you to output to an alternative location.
Another recovery option is to restore using the Bare Metal option by utilising the recovery media created. I chose to do this and restore it into a Hyper-V environment. By doing this I was mimicking the use of different hardware to the Windows operating system.
So, I booted from the ISO and was presented with a Veeam EndPoint Recovery Screen. On this screen you have three options;
To start I clicked on Tools and this expanded my choices;
This recovery media is very useful, especially ‘Reset Password’. I didn’t test it here as I didn’t yet have a Windows Installation in the Hyper-V platform. I then moved back to the previous screen and began the Bare Metal Restore.
The first thing you need is access to the backup files from which you will restore. This was tricky in my case as I was using Hyper-V to test and so couldn’t pass through my USB drive. I had to share it from the host and connect to the network.
The options when performing a bare metal restore are local disk and network storage.
Once you have presented the backup files you can select what you wish to restore.
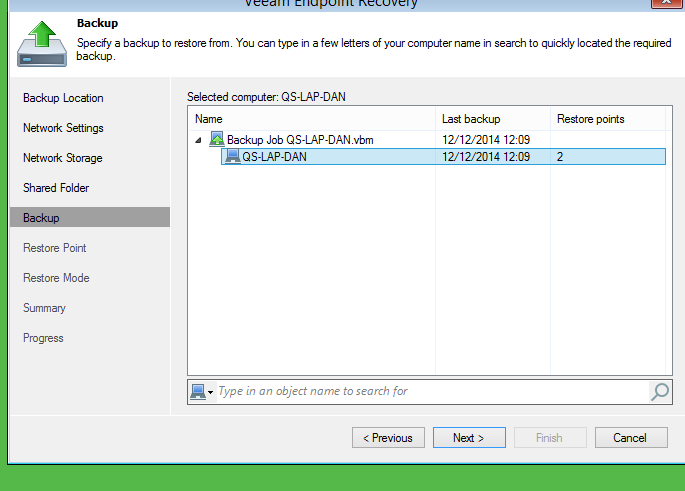
Select the backup you wish to restore and click next then select the restore point you want and click next again.
You then have three more options
The manual mode instantly drew me in as this gave the ability to resize volumes and partitions. As I was using Hyper-V I purposely made the drives smaller than the machine I backed up. But big enough to take the restored backup. So off I went with the manual restore but instantly hit a wall I couldn’t restore my 238GB volume to a 60GB disk, even though there was only 50GB of data in the volume. It seemed I needed to match this size in order to perform a restore. This is something I think Veeam should allow as it is common to have different size drives.
So I shut down and resized my disks, with the machine now provisioned with a thin provisioned disk I restarted the restore process once again. Hooray, we are now working and I have the option to ‘Run Now’. Once the restore is running you are presented with a progress screen as it restores each partition. See Fig4.
Fig4
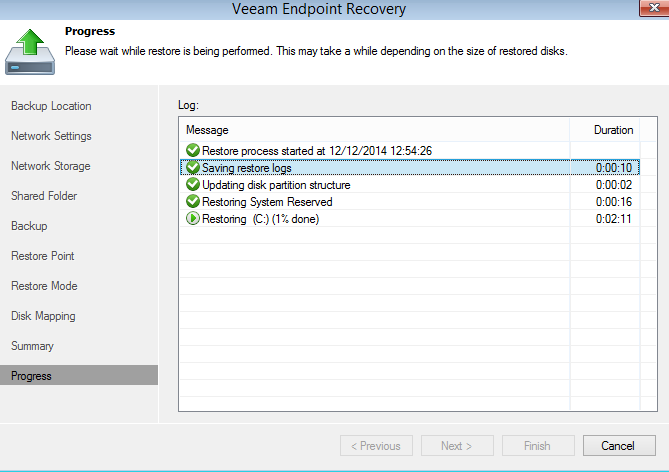
The whole process took about ninety minutes and when I booted the virtual machine after completion it worked perfectly.
Given this is a Beta version I thought it was going to be a little buggy but it’s pretty solid.
It’s a free product, and as the general release will integrate with Veeam Backup and Replication using repositories you can’t ask for much else. I think what Veeam have done here is very clever as by giving the product away will mean it many will adopt it where people use other vendor software. You need to understand it’s by no means a full replacement to a physical server backup solution mainly as there is no official support, but it does aid in the protection for those of us who swear by virtualisation and have those token physical servers. It’s also great for desktops or laptops especially if they are all backing up centrally to your repositories.
I hope that Veeam does look to improve the product and maybe bring a paid for version that would include encryption, deduplication and multiple backup schedules. The icing on the cake for this product from my opinion would be to enable it to backup to Veeam Cloud Connect so that it protects those mobile users everywhere they go back to a central repository.
All in all another great product, well done Veeam, keep up the good work!